How to Send Us Print-Ready Files Using Canva
If you’re using Canva to create your print designs, it’s important to follow the steps below to ensure your file is properly formatted for printing. This will help us deliver the best possible results for your order.
Downloading Your Print Design
-
Create or open the existing design you want to print in Canva.
-
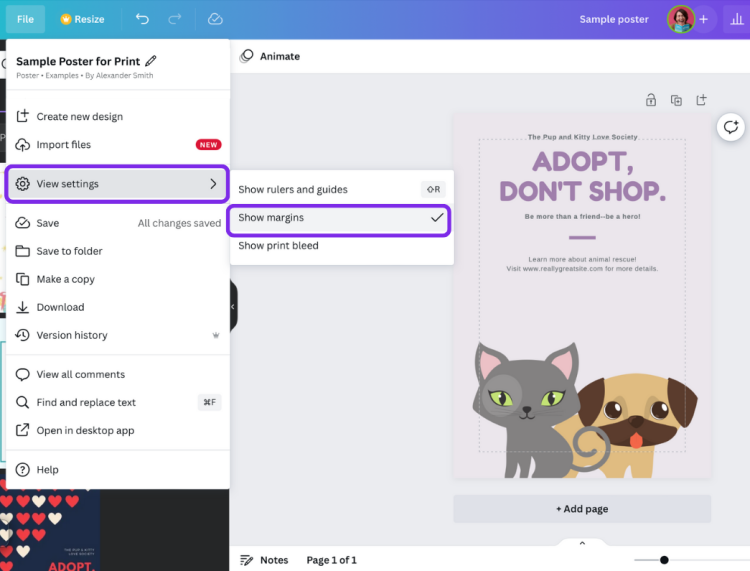
Add margins and bleed to your design and adjust elements as needed.
-
To learn more, refer to Canva’s guide on margins, rulers, bleed, and crop marks.
-
-
Set up your guides:
-
Use guides to create a ¼ inch margin around your design. This will help keep your text and logos within a safe area.
-
-
Download your design:
-
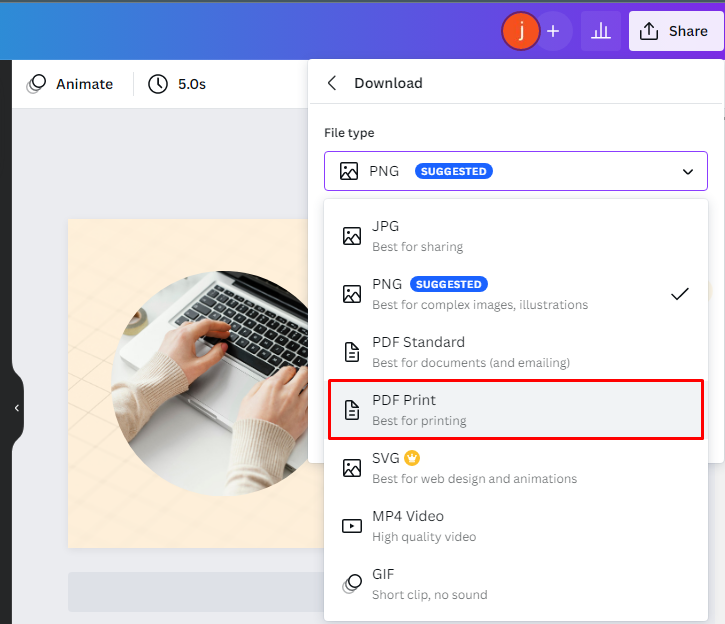
From the editor menu bar, click Share and select Download.
-
In the file type dropdown, choose PDF Print for the highest quality.
-
Optional: If you need crop marks, tick Crop marks and bleed.
-
Optional: Tick Flatten PDF to optimize the file for print.
-
-
Complete your download:
-
If you’ve used any premium elements, make sure to pay for them before downloading.
-
-
Send us your PDF file. You’re all set for us to print your beautiful design!
Important Notes About Canva Files
When designing for print, certain settings can make or break the final product. Here are some critical points to keep in mind when using Canva to create your print file:
Resolution, Color Mode, and Bleed Settings
- Resolution: Your images must be high-quality for a sharp print. We recommend using images with at least 300dpi (250dpi in a pinch).
- Color Mode: Canva’s free version only exports in RGB, which is optimized for screens. However, RGB colors may appear different in print. For accurate color reproduction, you will need to use Canva’s Pro version to export files in CMYK, which is designed specifically for print.
- Bleed Settings: To avoid white borders on your final product, enable the “Show Bleed” option in Canva. This ensures that your design extends beyond the trim edge.
- Margins: Margins help prevent important elements from being cut off during the printing process. Make sure your text and key design elements are safely inside the margin area.
Pay Attention to Your Proof!
While Canva is a great tool for quick and easy designs, it may not always be the best choice for professional printing, especially when considering the following issues:
Font Issues:
- Proprietary Fonts: Canva uses its own proprietary fonts, such as Canva Sans, which are only available within their platform. If we need to adjust your file for any reason, we may not have access to these fonts, which could cause issues or require font substitutions that affect the design.
Tip: When using Canva, try to choose common fonts that are more universally available, or convert your text to outlines in PDF before submitting it.
Color Conversion:
- RGB to CMYK Conversion: Canva designs in RGB by default, and when files are converted to CMYK for print, there can be inaccurate color results. For example, RGB blacks may appear as a dull gray instead of a rich black. True print-ready black should be 100% K (black) for proper ink coverage.
Tip: Double-check your color settings before finalizing your design to avoid unwanted surprises in the printed product.
Image Resolution:
- Hidden Resolution Issues: Canva doesn’t display the actual resolution of images when you resize them. This can result in pixelated or blurry prints if images are resized too small or too large. To maintain resolution, images should be properly sized in a program like Photoshop before being imported into Canva.